The Rate-46 "Power Gap": When the Legs Out-Muscle the Lower Back
Some legend today did 10 × 30s on, 90s off at rate 46ish full out (holding a 1:16 split for a while).
On the first three reps, the power curve on the monitor looked like this:
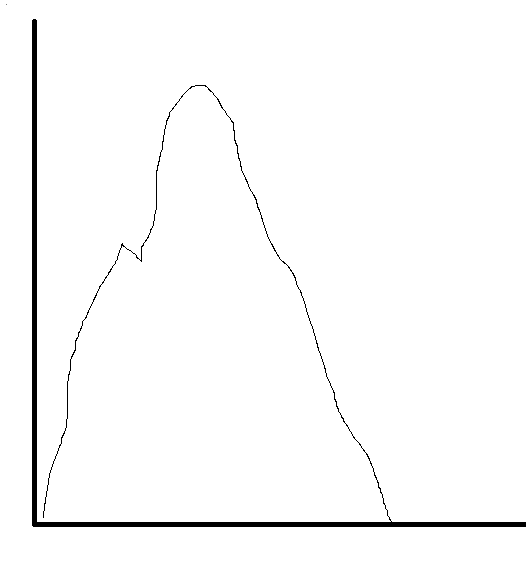
Here is what my biomechanical read of this: the leg drive is so fast/violent off the front end that it completely saturates your lower back, so when it comes time to swing over, there is zero spare capacity left to start the swing. The notch on the way up is your lower back pinned at \(100\%\) just holding posture while your legs finish their initial push—and then once the lats and arms lock on and take the pressure off the lower back, the whole upper body and hip swing unload together to build the main peak.
To see this in action, I ran our digital rower at Rate 46 spm capped at the model's actual muscle saturation limits. (Our digital rower is a 75 kg anatomical standard, not a 100 kg beast, so its muscle-saturated ceiling at rate 46 lands at 1:38.3 / 500m (369 W average, 1,640 W peak) instead of 1:16—same physics, fewer pancakes.)
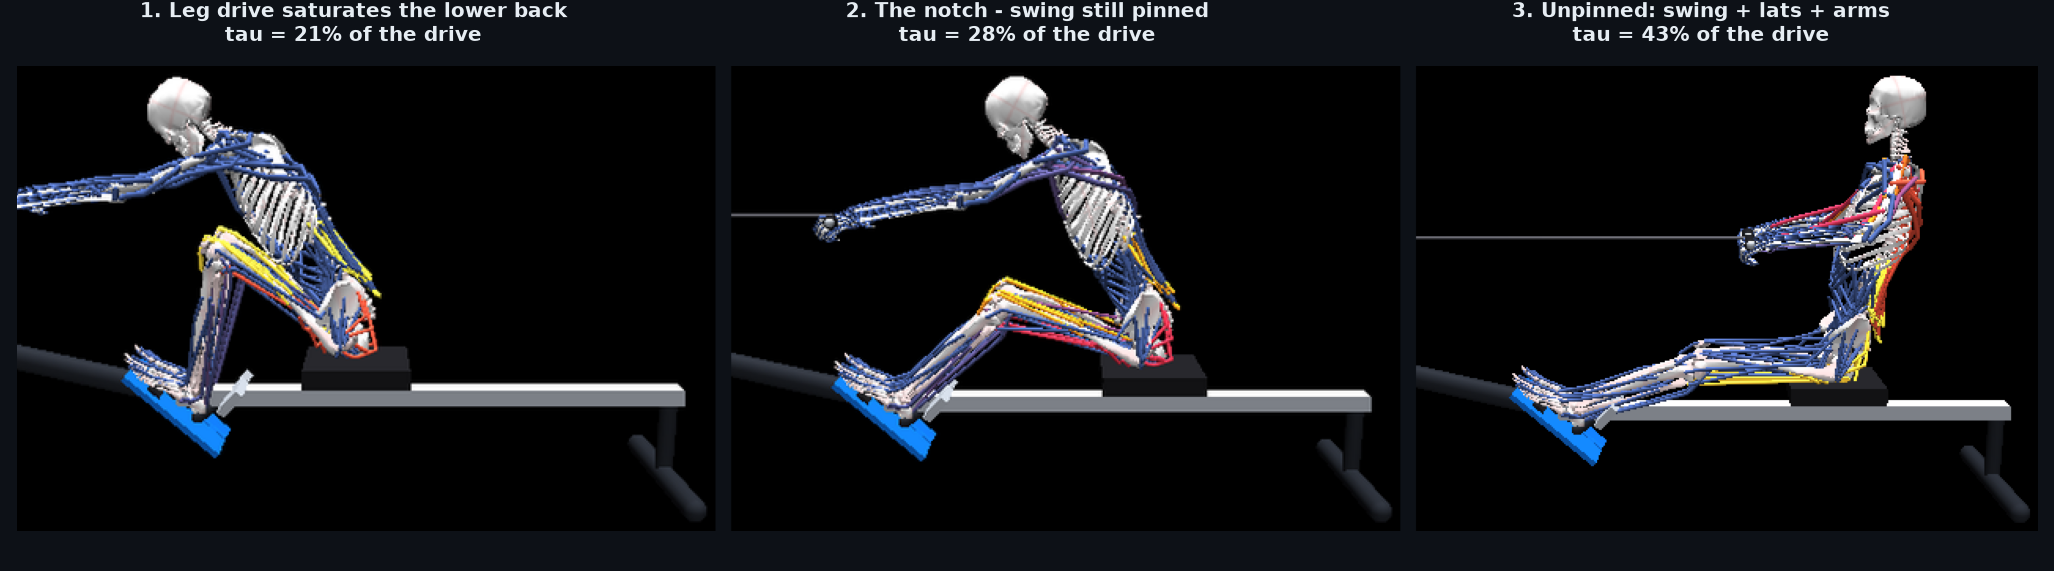
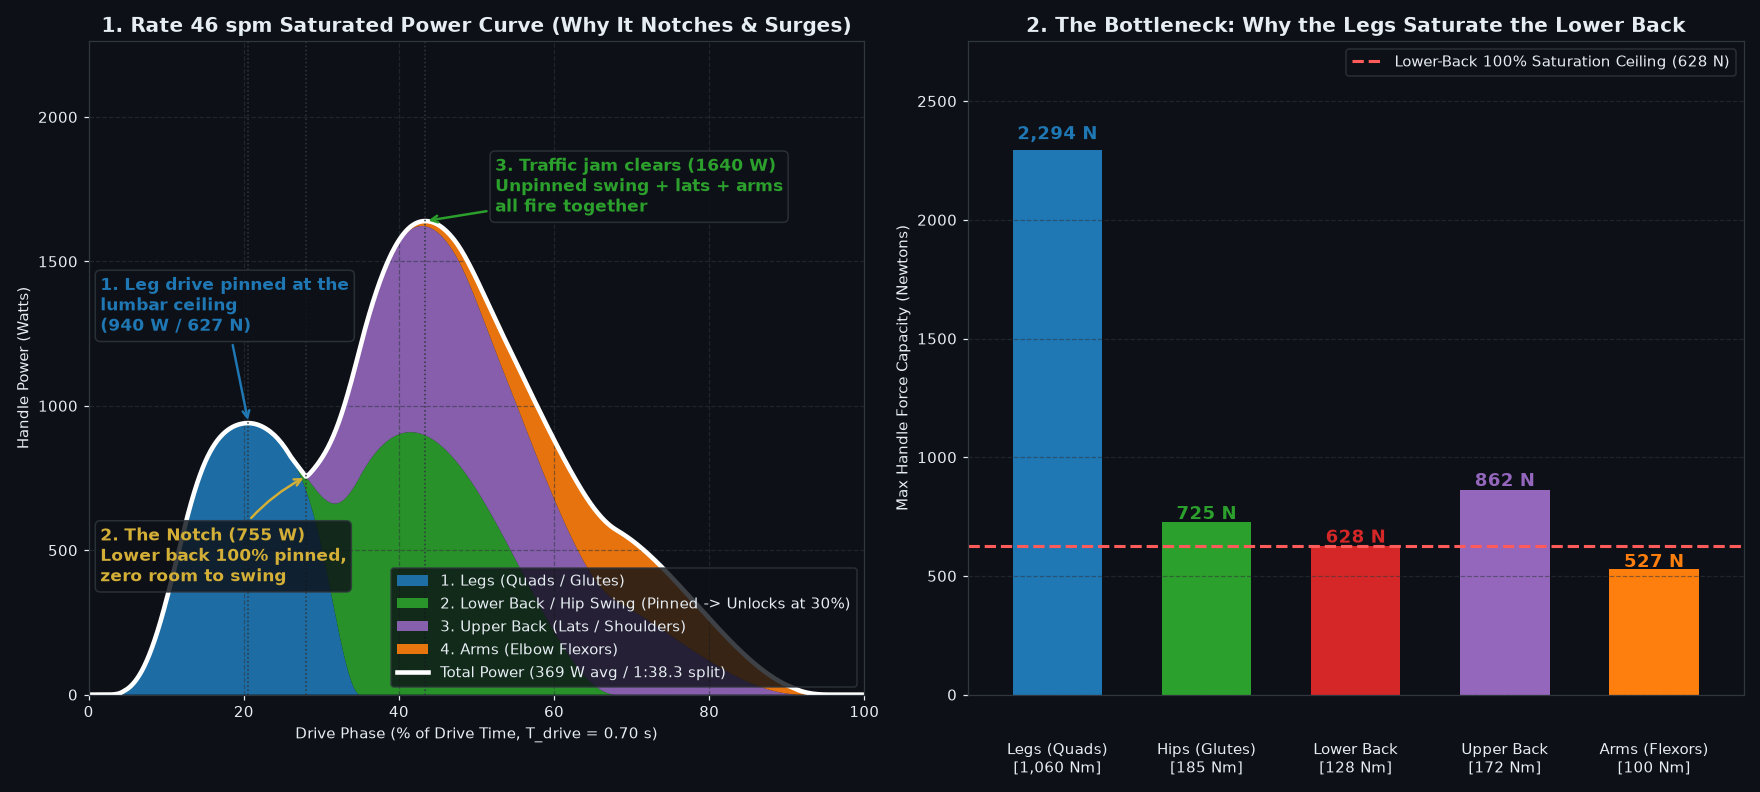
1. The Bottleneck: A 2,294 N Leg Engine Bolted to a 628 N Lower Back
When we pull the maximum torque and handle-force capacities for each body segment straight out of the 416-muscle model (see Panel 2 below), the mismatch is obvious:
- The Legs (
Quadriceps): \(1{,}060\text{ N}\cdot\text{m}\) of knee extension torque across both legs (vaslat,vasmed,vasint,recfem). Over the \(46\text{ cm}\) knee-over-footplate lever that is worth \(2{,}294\text{ N}\) of handle force—and it stays above \(750\text{ N}\) right through the leg phase even at sprint shortening speeds. - The Hips (
Glutes & Hamstrings): \(185\text{ N}\cdot\text{m}\) of hip extension torque across the \(26\text{ cm}\) seat lever \(\implies\) \(725\text{ N}\) of handle force capacity. - The Bottleneck — The Lower Back (
Lumbar Erecti + QL): Only \(128\text{ N}\cdot\text{m}\) of extension torque across L5/S1 (IL_L,LTpL, the lumbar multifidi,QL). Across the \(20.3\text{ cm}\) vertical lever from that joint up to the chain line, the lower back hits \(100\%\) saturation at just \(628\text{ N}\) of handle force! - For reference, the two segments that pull directly on the handle and so never have to be threaded through L5/S1: Upper Back (
LAT,TMAJ,DELT2, rotators) \(172\text{ N}\cdot\text{m} \implies 862\text{ N}\), and Arms (BRA,BRD,BIC) \(100\text{ N}\cdot\text{m} \implies 527\text{ N}\).
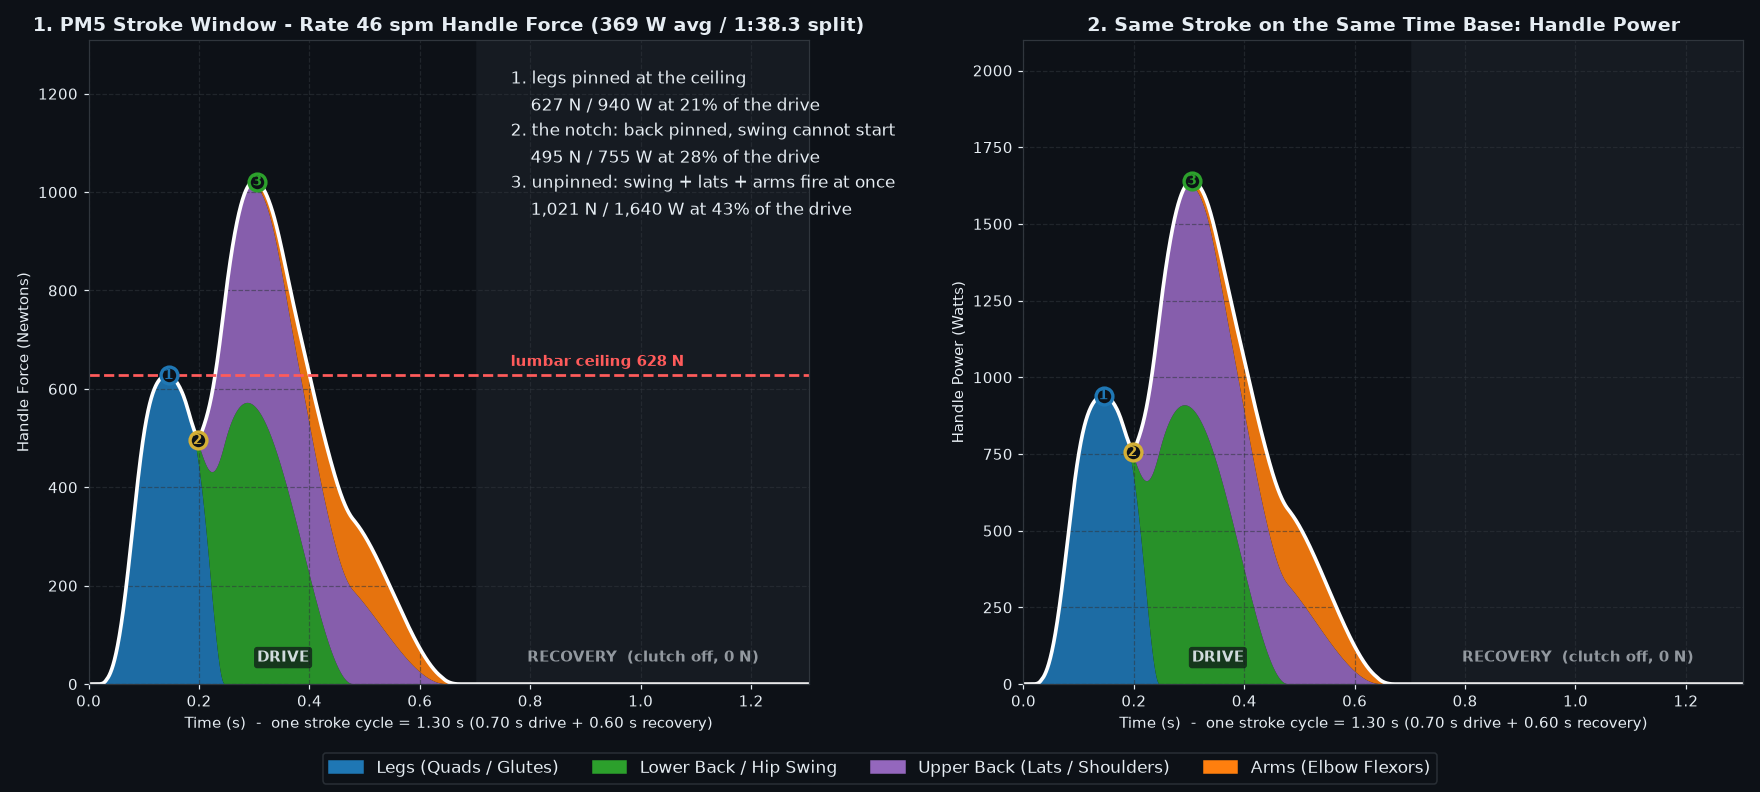
2. The Same Stroke, the Way the Monitor Shows It
The panel above stretches the drive across the whole x-axis, because that is the easiest way to read the muscle split. The PM5 does not do that: its stroke window plots handle force against real time through the entire cycle, so the drive takes the 0.70 s it actually takes and the recovery is a long flat line at zero (the clutch is off, the wheel is freewheeling).
Put the simulation on that time base and it comes out as pretty close to what i drew above (i promise i will collect better data next time)
3. Step-by-Step Diagnosis of the Curve
- 0% – 21% Drive (First Peak —
969 W/627 N): Your quads detonate off the catch and slam handle tension straight into the \(\sim 628\text{ N}\) lower-back saturation ceiling. Every muscle fiber in your lumbar erectors is now locked at \(100\%\) just keeping your spine from folding in half under the leg push. - 21% – 29% Drive (The Notch — Drops to
739 W): At rate 46 your knees are extending at \(\approx 500^\circ/\text{s}\), so the leg drive is finished by \(\sim 35\%\) of the drive and pure leg force rolls off the muscle force-velocity curve before the swing can start. It can't start anyway, because your lower back has zero spare torque left to accelerate the torso backward while holding peak leg force. That brief gap between the fading leg impulse and the stalled swing carves the \(-229\text{ W}\) notch. - 29% – 43% Drive (The Traffic Jam Clears —
1,676 WMain Peak): The moment the legs fall back below the \(628\text{ N}\) ceiling two things happen at once to break the logjam:- The erectors are unpinned, so whatever handle force they have not spent holding posture goes into the trunk swing, AND
- Your Upper Back (
Lats / Rotators) and Arms kick in, bracing the thoracolumbar fascia like a guy-wire and pulling the handle directly—neither one has to be threaded through L5/S1. - Once unpinned, your unloaded Hip/Trunk Swing (
Green), Upper Back (Purple), and Arms (Orange) all fire at the same time (\(\tau = 43\%\)) when the flywheel is already spinning fast (\(P = F \cdot v\))—sending the main peak shooting up to1,676 W!
- After the peak, as the trunk finishes its layback, the lats and elbow flexors smoothly carry the handle all the way to the finish (\(96\%\) of the drive) before the recovery begins.
| Drive Landmark (Rate 46 spm, \(T_{\text{drive}} = 0.70\text{ s}\)) | Drive Phase (\(\tau\)) | Handle Force | Handle Power | What Your Muscles Are Doing |
|---|---|---|---|---|
| 1. First Peak (Leg Drive Ceiling) | \(21\%\) | \(627\text{ N}\) | \(969\text{ W}\) | Quads push hard; Lower Back hits \(100\%\) saturation (\(628\text{ N}\) ceiling) holding posture. |
| 2. The Notch ("Power Gap") | \(29\%\) | \(470\text{ N}\) | \(739\text{ W}\) | Knees open fast (\(\approx 500^\circ/\text{s}\)) so leg force dips while pinned Lower Back still can't swing. |
| 3. Main Peak (Traffic Jam Clears) | \(43\%\) | \(1{,}019\text{ N}\) | \(1{,}676\text{ W}\) | Lats brace spine + legs unload ceiling \(\implies\) Unpinned Swing + Lats + Arms fire all at once. |
4. The fade
After rep 4, the curve started looking very nice and round again. I'm guessing that's because the legs were cooked. That is a whole other story for another time.