Why "Body Over" Starts at the Pelvis: A 300 N Static Catch Test
When I say "body over" on the recovery, I mean rocking the pelvis forward on the sit-bones (anterior pelvic tilt, \(\approx +15^\circ\)) so the whole torso leans forward as one braced unit, rather than sitting back on your tailbone with an unhinged, tucked pelvis (\(\approx -5^\circ\)).
To see why this matters without getting lost in stroke-length math or flywheel dynamics, let's look statically at the catch and pull forward on the handle with a \(300\text{ N}\) (~30 kg / 67 lb) static load. I've exagerated the lean forward for clarity. There's room for negotiation on the pelvic tilt angle.
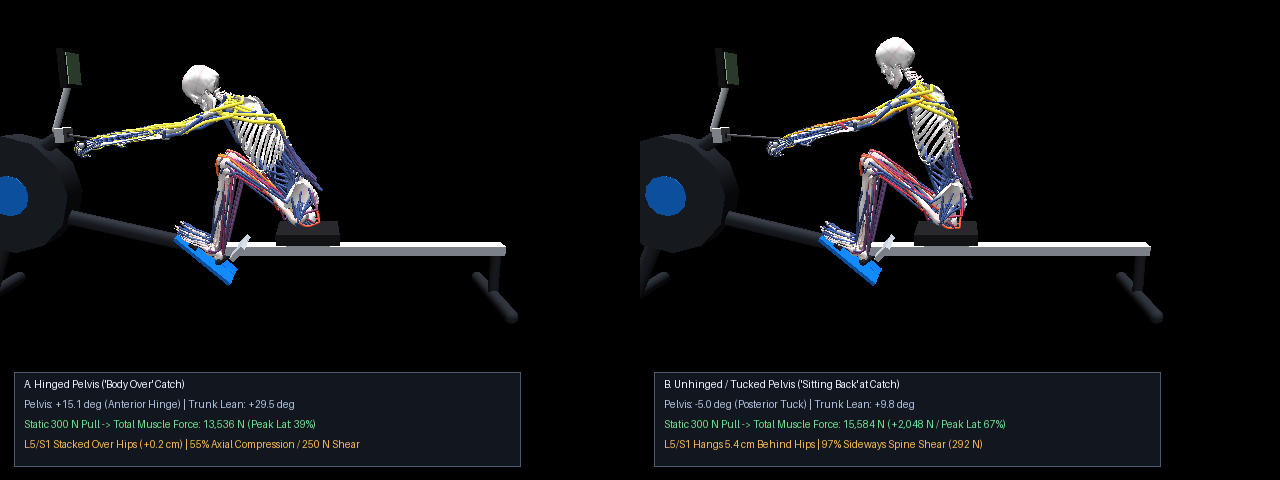
1. What Makes "Body Over" safer and easier to hold?
When the handle pulls forward with \(300\text{ N}\), there are two immediate wins for the Hinged Pelvis ("Body Over") position:
A. Your Lower Spine Acts as a Compression Strut Instead of a Shear Beam (good luck translating that to german)
- Hinged Pelvis (
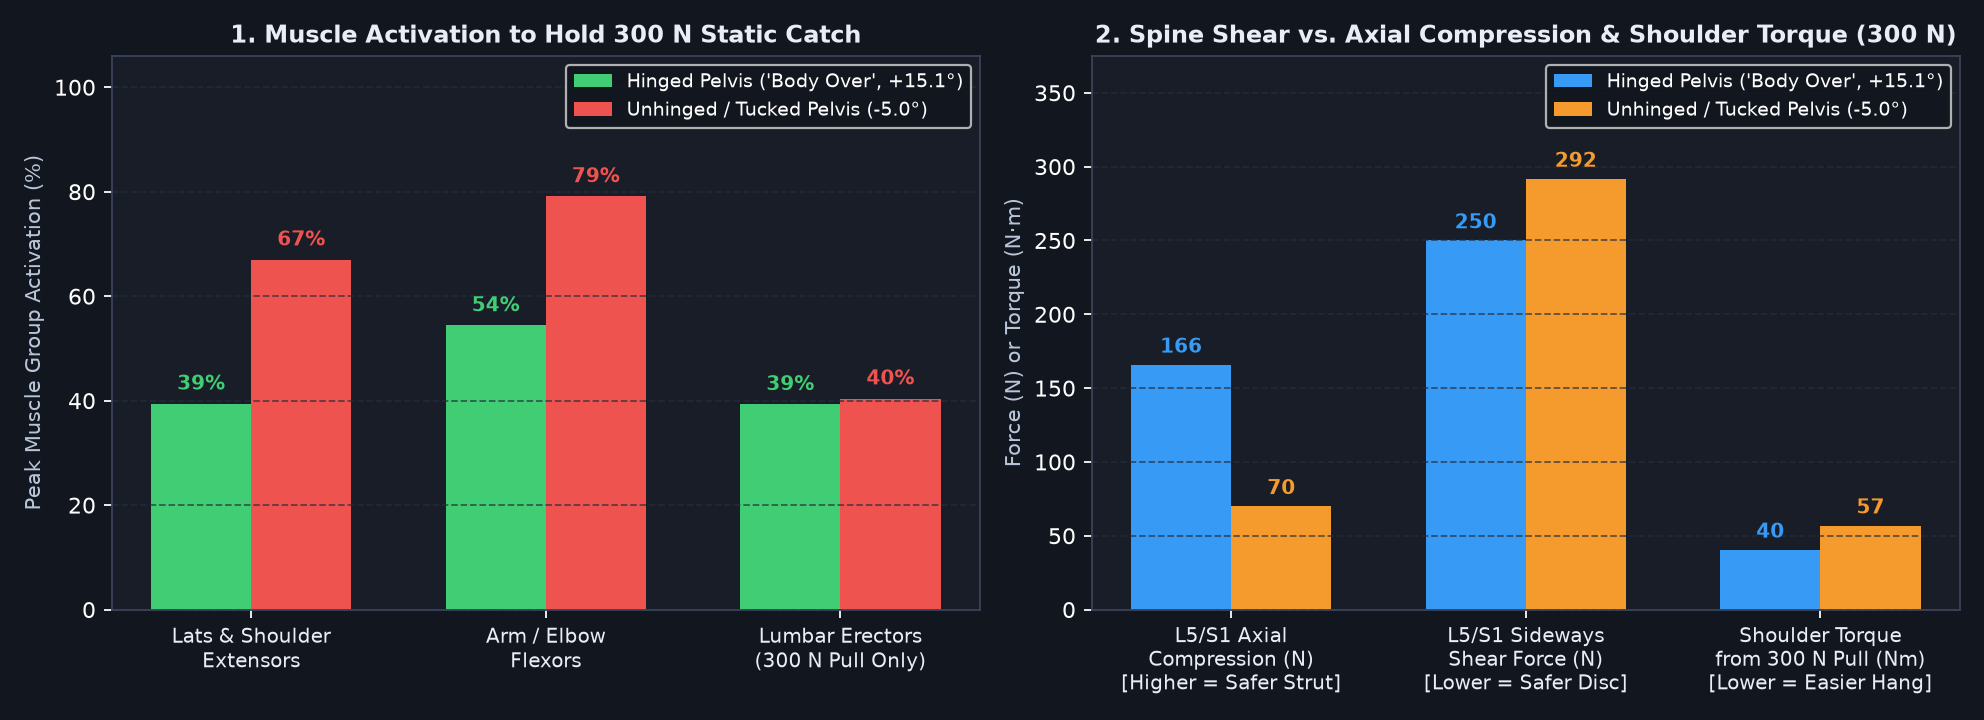
+15.1°): Rocking onto the front of your sit-bones rotates the base of your spine (L5/S1) forward so it stacks directly on top of your hip sockets and angles your lumbar spine into the line of pull. Over half of the handle load (\(166\text{ N}\), or \(55\%\)) travels straight down the vertebrae as axial tension (which discs handle well), while sideways disc shear drops to \(250\text{ N}\). - Unhinged Pelvis (
-5.0°): Sitting on your tailbone leaves L5/S1 hanging behind your hip sockets with a nearly vertical lower spine. Axial support drops to \(70\text{ N}\) (\(23\%\)), and \(292\text{ N}\) (\(97\%\) of the \(300\text{ N}\) pull!) saws sideways across the L5/S1 disc as anterior-posterior shear. - Fun fact, L4/5 and L5/S1 together make up the vast majority of disc hernias. Anne wanted me to point out here that you should not read this as a strong suggestion this will lead to injury, because it is likely the body will adapt to it and absorb such stress just fine.
B. You "Hang" on Your Frame Instead of Muscling the Handle with Your Shoulders & Arms
- Hinged Pelvis (
+15.1°tilt,+29.5°trunk lean): Your shoulders drop down closer to the height of the handle chain. The \(300\text{ N}\) pull runs nearly straight into the shoulder sockets. -
The Muscle Cost:
- Shoulder torque jumps by \(+40\%\) when unhinged (\(40.5\text{ N}\cdot\text{m} \to 56.9\text{ N}\cdot\text{m}\)).
- Lat & shoulder extensor peak activation jumps from \(39\%\) (\(2{,}674\text{ N}\)) to \(67\%\) (\(3{,}253\text{ N}\)).
- Arm & elbow flexor peak activation jumps from \(54\%\) (\(1{,}593\text{ N}\)) to \(79\%\) (\(1{,}849\text{ N}\)).
- Total whole-body muscle force needed just to hold the \(300\text{ N}\) handle load rises from \(13{,}536\text{ N}\) to \(15{,}584\text{ N}\) (\(+2{,}048\text{ N}\) / \(+15\%\) wasted muscle force).
-
Should point out here that the power-C will bring the sholders down and compensate a lot of this. But that's a discussion for some other time.
| Static \(300\text{ N}\) Catch Metric | Hinged Pelvis ("Body Over", \(+15.1^\circ\)) | Unhinged / Tucked Pelvis (\(-5.0^\circ\)) | Difference |
|---|---|---|---|
| Total Muscle Force to Hold \(300\text{ N}\) | \(13{,}536\text{ N}\) | \(15{,}584\text{ N}\) | \(+2{,}048\text{ N}\) (\(+15.1\%\)) wasted when unhinged |
| Lats & Shoulder Extensors (Peak Act / Force) | \(39.4\%\) (\(2{,}674\text{ N}\)) | \(67.0\%\) (\(3{,}253\text{ N}\)) | \(+27.6\%\) higher activation when unhinged |
| Arm & Elbow Flexors (Peak Act / Force) | \(54.4\%\) (\(1{,}593\text{ N}\)) | \(79.1\%\) (\(1{,}849\text{ N}\)) | \(+24.7\%\) higher activation when unhinged |
| L5/S1 Stack Over Hip Sockets (\(y_{\text{L5/S1}} - y_{\text{Hip}}\)) | \(+0.2\text{ cm}\) (Stacked) | \(+5.4\text{ cm}\) (Behind Hips) | \(27\times\) larger cantilever offset |
| L5/S1 Axial Compression vs. Sideways Shear | \(166\text{ N}\) Axial / \(250\text{ N}\) Shear | \(70\text{ N}\) Axial / \(292\text{ N}\) Shear | \(97\%\) of pull becomes disc shear when unhinged |
Lower-Back (L5/S1) Torque from \(300\text{ N}\) Pull |
\(61.0\text{ N}\cdot\text{m}\) (\(39.3\%\) Erectors) | \(64.1\text{ N}\cdot\text{m}\) (\(40.4\%\) Erectors) | Only \(5\%\) difference from horizontal pull alone |
Athlete Takeaway: 2 Cues to Remember
- Rock Over onto Your Sit-Bones Early (During "Body Over"): Set your \(+15^\circ\) pelvic tilt while your knees are still flat on the recovery. Once your shins are vertical at the catch, your hamstrings are stretched tight and it is too late to rock the pelvis forward.
- Drop Your Shoulders into the Line of the Chain: Hinging from the pelvis lowers your shoulders into line with the handle (\(39\%\) lat load vs. \(67\%\)) and stacks L5/S1 right over your hip sockets (\(+0.2\text{ cm}\)) so the catch load compresses your spine like a pillar instead of shearing it sideways.